
These Grilled Cheese Roll-Ups are a delightful twist on the classic grilled cheese sandwich. Perfect for kids and adults alike, these crispy, buttery roll-ups are filled with gooey cheese, making them an ideal snack or quick meal. Whether it’s a fun lunch idea or a party appetizer, you’ll love how simple and delicious they are.
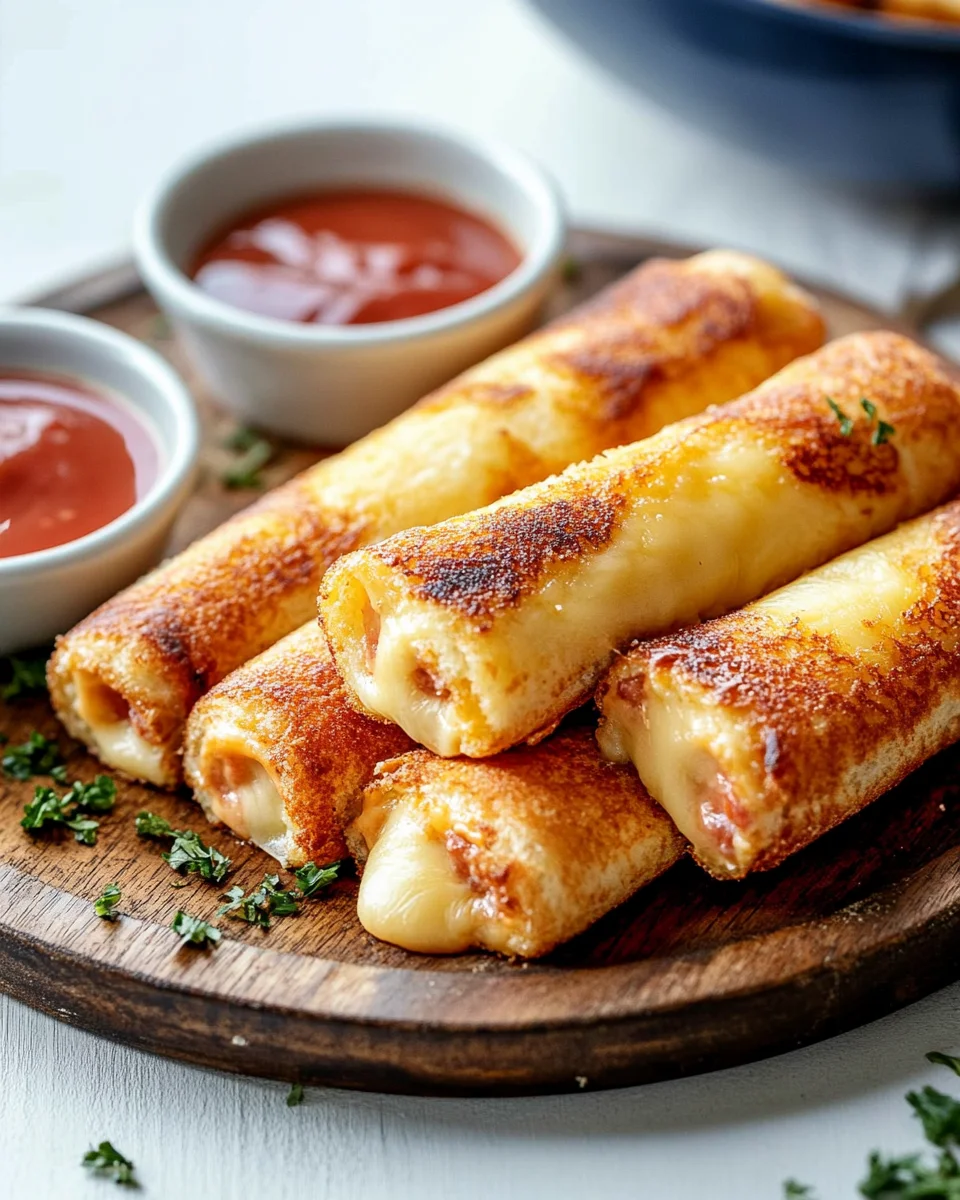
Why You’ll Love This Recipe
- Quick to Prepare: With just a few ingredients and minimal prep time, you can make these roll-ups in under 20 minutes.
- Kid-Friendly: Kids adore the fun shape and cheesy filling, making them perfect for picky eaters or school lunches.
- Versatile Options: Feel free to customize with your favorite cheeses or add-ins like ham or veggies for added flavor.
- Easy to Serve: Cut them into bite-sized pieces for parties or snacks; they’re perfect for dipping in your favorite sauces!
- Minimal Cleanup: With just a skillet required, cleanup is a breeze after enjoying these tasty treats.
Tools and Preparation
To make these grilled cheese roll-ups, you’ll need some essential kitchen tools to ensure everything goes smoothly.
Essential Tools and Equipment
- Rolling pin
- Skillet
- Toothpicks (optional)
- Knife
Importance of Each Tool
- Rolling pin: Helps flatten the bread evenly, ensuring a perfect wrap around the cheese.
- Skillet: Provides even heat for frying the roll-ups until golden brown and crispy.
- Toothpicks: Keep the roll-ups secure while cooking, especially if you’re adding extra ingredients.
Ingredients
For these delicious grilled cheese roll-ups, you will need:
The Casserole Dish Thousands of Families Can't Cook Without!
For the Roll-Ups
- 6 slices of bread
- 1 cup thinly shredded cheese (doesn’t have to be exact)
- 6 thinly sliced ham (optional)
- 2 tbsp of butter
How to Make Grilled Cheese Roll-Ups
Step 1: Prepare the Bread
Trim the crusts off the bread slices to create a uniform base. This helps in rolling the bread easily without breaking.
Step 2: Flatten the Bread
Roll each slice of bread flat using a rolling pin. Aim for an even thickness to ensure the roll-ups cook uniformly.
Step 3: Add Filling
Add shredded cheese on top of each flattened slice. If you’re using ham, layer it on along with the cheese for added flavor.
Step 4: Roll Them Up
Carefully roll each slice tightly from one end to the other. If necessary, secure with toothpicks to keep them intact during cooking.
Step 5: Cook in Skillet
Heat a skillet over medium to medium-low heat and add butter. Once melted, place the roll-ups in the skillet. Cook for about 5–8 minutes, turning occasionally until they turn golden brown.
Step 6: Serve
Remove from skillet and let cool slightly. Cut in half if desired and serve warm for best flavor!
These grilled cheese roll-ups are not only easy to make but also provide endless possibilities for variations based on your taste preferences! Enjoy them as a quick snack or part of a delightful meal that everyone will love.
How to Serve Grilled Cheese Roll-Ups
Grilled cheese roll-ups are not only delicious but also incredibly versatile. You can serve them in various ways to enhance their appeal for any occasion. Here are some creative serving suggestions that will delight your guests and family.
Pair with Dipping Sauces
- Tomato Soup: A classic pairing, this warm soup complements the cheesy goodness of roll-ups perfectly.
- Ranch Dressing: Dip these roll-ups in ranch for a creamy, flavorful twist that kids love.
- Spicy Ketchup: Add a kick to your snack with spicy ketchup for those who enjoy a bit of heat.
Create a Party Platter
- Vegetable Sticks: Fresh carrot and cucumber sticks add crunch and balance out the richness of the roll-ups.
- Cheese Cubes: Include various cheeses for guests to nibble on alongside the main dish.
- Fruit Skewers: Sweet fruit skewers provide a refreshing contrast to the savory flavors.
Make It a Meal
- Side Salad: A simple green salad with vinaigrette brings freshness and rounds out the meal nicely.
- French Fries: Crispy fries are always a hit and make for a hearty side that pairs well with these cheesy bites.

How to Perfect Grilled Cheese Roll-Ups
Perfecting grilled cheese roll-ups is easy with a few helpful tips. Follow these suggestions to ensure your roll-ups come out crispy and delicious every time.
- Use Fresh Bread: Fresh bread rolls better and achieves that perfect crispy texture when cooked.
- Don’t Overfill: Adding too much cheese or ham can make rolling difficult and cause spills during cooking.
- Control the Heat: Cooking over medium-low heat allows the cheese to melt evenly without burning the bread.
- Secure Tightly: Make sure each roll is tightly secured before cooking to prevent them from unrolling in the skillet.
- Experiment with Cheese: Try different types of cheese such as cheddar, mozzarella, or gouda for varied flavors.
- Add Seasonings: Sprinkle garlic powder or Italian herbs on the butter before cooking for an extra flavor boost.
Best Side Dishes for Grilled Cheese Roll-Ups
Grilled cheese roll-ups can be paired with many side dishes that complement their flavors. Here are some great options to consider when serving this delightful snack.
- Classic Tomato Soup: This warm soup enhances the bite of grilled cheese roll-ups and adds comfort to your meal.
- Crispy Potato Chips: A crunchy side that provides texture contrast while being easy to prepare.
- Mixed Green Salad: Light and fresh, a green salad balances the richness of grilled cheese roll-ups perfectly.
- Pickle Slices: Tangy pickles cut through the creaminess of cheese, adding zing to each bite.
- Coleslaw: Creamy coleslaw adds crunch and complements the savory flavors beautifully.
- Fruit Salad: A colorful mix of fruits offers a sweet counterpoint that makes for a delightful combination.
Common Mistakes to Avoid
Making grilled cheese roll-ups can be easy, but it’s important to avoid common pitfalls.
- Using stale bread: Fresh bread rolls up better and ensures a crispy texture. Always use soft, fresh bread for the best results.
- Overfilling with cheese: Adding too much cheese can make it difficult to roll. Stick to a moderate amount to keep your roll-ups intact.
- Cooking at high heat: High heat can burn the outside before the cheese melts. Cook on medium or medium-low for even cooking.
- Not trimming crusts: Leaving crusts can make rolling difficult and affect presentation. Trim them off for smooth and neat roll-ups.
- Skipping toothpicks: If your roll-ups are unsteady, they might fall apart during cooking. Use toothpicks to secure them if needed.
Refrigerator Storage
- Store grilled cheese roll-ups in an airtight container.
- They can be kept in the refrigerator for up to 3 days.
Freezing Grilled Cheese Roll-Ups
- Wrap each roll-up tightly in plastic wrap or aluminum foil.
- Place them in a freezer-safe bag or container.
- Grilled cheese roll-ups can be frozen for up to 2 months.
Reheating Grilled Cheese Roll-Ups
- Oven: Preheat the oven to 350°F (175°C). Place the roll-ups on a baking sheet and heat for about 10-15 minutes until warm and crispy.
- Microwave: Place the roll-up on a microwave-safe plate and cover with a damp paper towel. Heat in 30-second intervals until warmed through, but this may reduce crispiness.
- Stovetop: Heat a skillet over medium heat, add a bit of butter, and reheat for 3-5 minutes, turning occasionally until heated through and crispy again.
Frequently Asked Questions
What are Grilled Cheese Roll-Ups?
Grilled cheese roll-ups are a fun twist on classic grilled cheese sandwiches. They consist of flattened bread rolled up with melted cheese inside, creating a crispy snack or meal option.
Can I customize my Grilled Cheese Roll-Ups?
Absolutely! You can add various ingredients like different types of cheese, vegetables, or meats based on your preferences. Think of it as an opportunity to get creative!
How many calories are in Grilled Cheese Roll-Ups?
One serving of grilled cheese roll-ups contains approximately 321 calories, including optional ham. This makes them a satisfying yet light snack or meal option.
Are Grilled Cheese Roll-Ups suitable for kids?
Yes! These roll-ups are perfect kid-friendly snacks. Their fun shape and cheesy flavor make them appealing to children, plus you can easily customize them based on what they enjoy.
Can I prepare Grilled Cheese Roll-Ups ahead of time?
Yes! You can prepare the roll-ups ahead of time and store them in the refrigerator or freeze them for later use. Just reheat as needed!
Final Thoughts
Grilled cheese roll-ups offer a delightful twist on traditional comfort food that’s both fun and versatile. They’re perfect as snacks, appetizers, or quick meals. Feel free to customize your roll-ups with different cheeses or add-ins based on your taste preferences! Give this recipe a try; you won’t be disappointed!

Grilled Cheese Roll-Ups
- Total Time: 18 minutes
- Yield: Serves 6
Description
Grilled Cheese Roll-Ups are a fun and delicious twist on the beloved classic sandwich, perfect for both kids and adults. These crispy, buttery roll-ups are filled with gooey melted cheese, making them an ideal snack or quick meal option. Whether you’re looking for a playful lunch idea or a crowd-pleasing appetizer for your next gathering, these roll-ups are simple to prepare and full of flavor.
Ingredients
- 6 slices of bread
- 1 cup thinly shredded cheese (your choice)
- 6 thinly sliced ham (optional)
- 2 tbsp butter
Instructions
- Trim the crusts from the bread slices for easy rolling.
- Use a rolling pin to flatten each slice evenly.
- Spread shredded cheese over each flattened slice; add ham if desired.
- Roll each slice tightly from one end to the other; secure with toothpicks if needed.
- Heat butter in a skillet over medium heat. Cook the roll-ups until golden brown, about 5-8 minutes, turning occasionally.
- Let cool slightly before cutting in half and serving warm.
- Prep Time: 10 minutes
- Cook Time: 8 minutes
- Category: Snack/Appetizer
- Method: Frying
- Cuisine: American
Nutrition
- Serving Size: 1 roll-up (45g)
- Calories: 321
- Sugar: 1g
- Sodium: 680mg
- Fat: 22g
- Saturated Fat: 10g
- Unsaturated Fat: 12g
- Trans Fat: 0g
- Carbohydrates: 24g
- Fiber: 1g
- Protein: 9g
- Cholesterol: 30mg
Grab This Chef Knife Now - Almost Gone!

Leave a Comment