
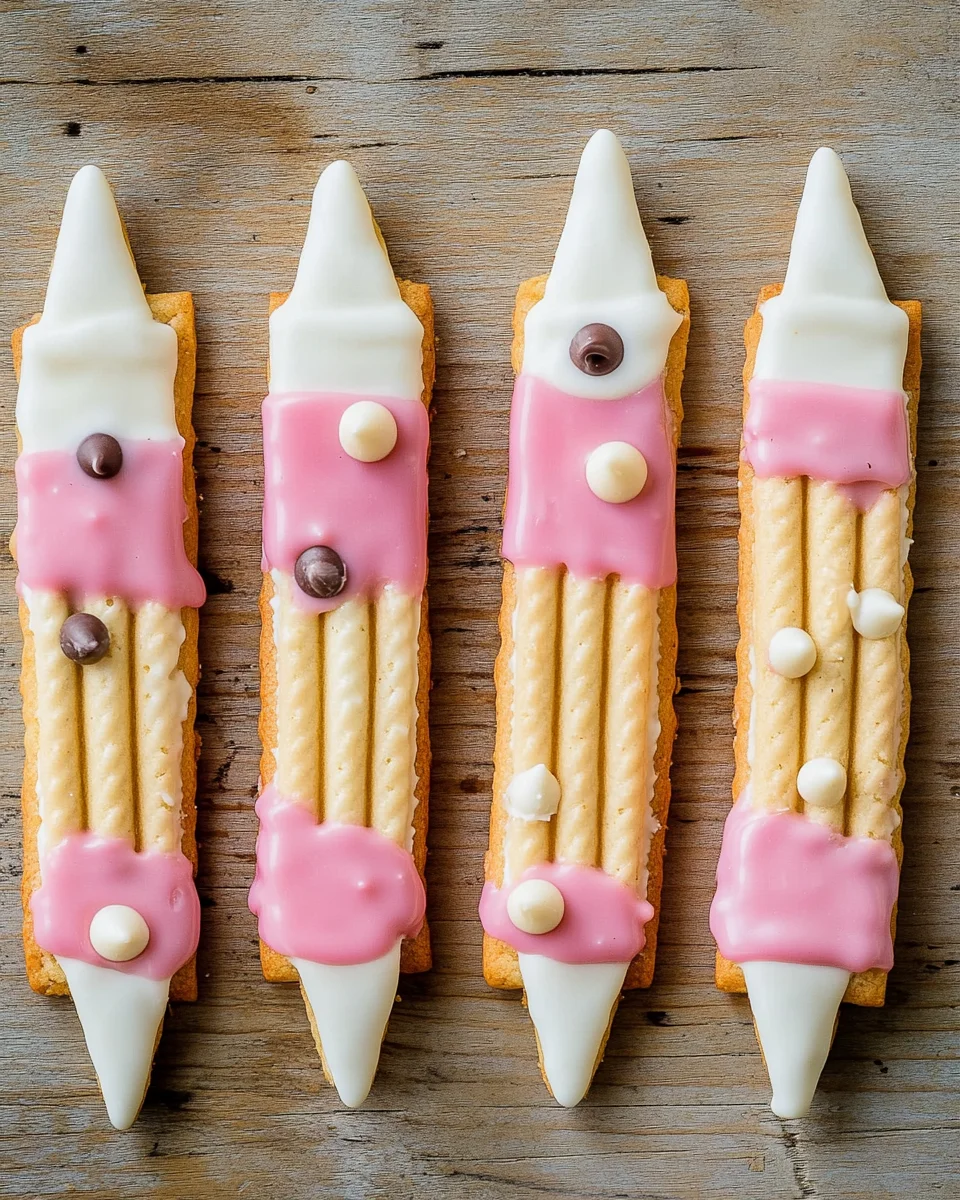
Make these adorable wafer pencil cookies for a delightful and easy back-to-school treat. These cute cookies are not only fun to make, but they also add a charming touch to school lunches or classroom celebrations. With their unique design resembling pencils, they are sure to be a hit with kids and adults alike. Plus, you can customize them for various occasions, making them versatile and delicious!
Why You’ll Love This Recipe
- Fun and Creative: These wafer pencil cookies are visually appealing and are a great way to get kids involved in the kitchen.
- Simple Ingredients: Made with just a few easy-to-find ingredients, this recipe is perfect for busy parents.
- Perfect for Any Occasion: While ideal for back-to-school, these cookies can be enjoyed at birthday parties or any school-related event.
- Quick Preparation: You can whip up these treats in no time, making them a great last-minute snack option.
- Delicious Flavor: The combination of vanilla wafers and chocolate melts creates a sweet flavor that everyone will love.
Tools and Preparation
Before diving into this fun recipe, gather your tools to ensure everything goes smoothly while making your wafer pencil cookies.
Essential Tools and Equipment
- Piping bag
-
5 piping tip
- Microwave-safe bowl
- Baking sheet
Importance of Each Tool
- Piping bag: Essential for decorating the cookies easily and precisely with the melted chocolate.
- #5 piping tip: This specific size allows for better control when creating the pencil details on your cookies.
- Microwave-safe bowl: Perfect for melting the chocolate wafers without any risk of damage.
Ingredients
To create these tasty wafer pencil cookies, you will need the following ingredients:
Amazon's Best Seller Pasta Bowls Are Almost Gone!
For the Cookies
- Vanilla Wafers (we used Voortman brand)
- Bright White Chocolate Melting Wafers
- Light Pink White Chocolate Melting Wafers
- Mini Chocolate Chip
How to Make Wafer Pencil Cookies
Step 1: Prepare Your Wafer Cookies
- Cut one end of each wafer cookie on both sides of the top to create a point.
- Melt the bright white chocolate melting wafers as directed by the package instructions.
Step 2: Fill Your Piping Bags
- Fill piping bags with both colors of melted chocolate wafers—pink for the eraser and white for the pencil point.
- Use #5 piping tip for easy piping; alternatively, you can use a smaller tip if desired.
Step 3: Decorate Your Cookies
- Pipe melted pink chocolate into the very bottom section of each wafer to resemble an eraser.
- Gently shake each cookie to smooth out the pink chocolate.
- Next, fill in the point of each wafer with melted white chocolate in a triangle shape and shake lightly again to smooth.
- Before the white chocolate hardens, place a mini chocolate chip on top as the lead tip of your pencil.
Now you’re ready to enjoy your adorable wafer pencil cookies! They make fantastic snacks for classrooms or festive treats during back-to-school season.
How to Serve Wafer Pencil Cookies
Serving wafer pencil cookies can be both fun and creative. These adorable treats are perfect for back-to-school celebrations, classrooms, or simply as a delightful snack at home. Here are some serving suggestions to make your presentation even more charming.
Cute Classroom Display
- Arrange the cookies in a pencil holder to mimic a real pencil box. This adds a playful touch to your classroom treats.
Snack Bags
- Place individual wafer pencil cookies in small clear bags tied with ribbon. Great for party favors or sharing with friends.
Themed Plates
- Serve the cookies on plates decorated with school-themed designs. This enhances the festive spirit of back-to-school gatherings.
Pair with Milk
- Offer wafer pencil cookies alongside glasses of cold milk. The classic combination is sure to please kids and adults alike.
Cookie Decorating Station
- Set up a decorating station where kids can add their own toppings to the cookies, such as sprinkles or colored icing.

How to Perfect Wafer Pencil Cookies
To ensure your wafer pencil cookies turn out perfectly, keep these tips in mind for a delightful treat every time.
-
Choose Quality Ingredients: Using high-quality wafers and melting chocolates will enhance the taste and appearance of your cookies.
-
Melt Chocolate Carefully: Follow package instructions for melting chocolate to avoid burning it. A microwave works well if you stir frequently.
-
Use Piping Bags for Precision: Filling piping bags allows for detailed designs. This helps create clean lines when decorating your pencils.
-
Practice Your Piping Technique: If you’re new to piping, practice on parchment paper first. This builds confidence before decorating the actual cookies.
Best Side Dishes for Wafer Pencil Cookies
Pairing side dishes with wafer pencil cookies can elevate your snack table. Here are some fantastic side dish ideas that complement these cute treats.
-
Fruit Skewers: Colorful fruit skewers add freshness and balance to the sweetness of the cookies.
-
Cheese Cubes: A selection of cheese cubes provides a savory contrast, making them a perfect addition to your snack spread.
-
Veggie Sticks with Dip: Crisp veggie sticks paired with hummus or ranch dressing offer a crunchy side option.
-
Yogurt Parfaits: Layered yogurt with granola and berries makes for a wholesome side that kids love.
-
Mini Sandwiches: Cute mini sandwiches filled with peanut butter or ham can round out the meal nicely.
-
Popcorn: Lightly salted popcorn adds texture and is an easy snack that everyone enjoys.
-
Trail Mix: A mix of nuts, dried fruits, and chocolate pieces provides energy and complements the cookie’s sweetness.
-
Granola Bars: Homemade or store-bought granola bars are great for adding variety without overshadowing the main treat.
Common Mistakes to Avoid
Making Wafer Pencil Cookies can be fun, but there are some common mistakes to watch out for. Here are a few:
-
Skipping the Piping Tip: Using the wrong piping tip can make decorating difficult. Always choose a tip that allows for precision, like #5 or #3.
-
Overheating Chocolate: Melted chocolate should be smooth but not too hot. Overheating can cause it to seize. Use a microwave in short bursts and stir frequently.
-
Not Smoothing the Chocolate: Failing to shake lightly after filling can lead to uneven layers. Always tap or shake the cookie gently to achieve a smooth finish.
-
Ignoring Cooling Time: Trying to add decorations before the chocolate hardens can lead to messy results. Allow enough time for each layer to set properly.
-
Using Stale Wafers: Freshness matters! Stale wafers may crumble easily and affect the overall look of your cookies. Always use fresh vanilla wafers for best results.
Storage & Reheating Instructions
Refrigerator Storage
- Store cookies in an airtight container.
- They can last up to 1 week in the refrigerator.
Freezing Wafer Pencil Cookies
- Freeze cookies individually on a baking sheet before transferring them to a container.
- They can be frozen for up to 3 months.
Reheating Wafer Pencil Cookies
-
Oven: Preheat to 350°F and warm cookies for about 5-10 minutes.
-
Microwave: Place cookies on a microwave-safe plate and heat for 10-15 seconds.
-
Stovetop: Use a non-stick pan over low heat, warming cookies gently until slightly softened.
Frequently Asked Questions
How do I make Wafer Pencil Cookies?
To make Wafer Pencil Cookies, cut one end of vanilla wafers into a point, melt white and pink chocolate wafers separately, and use them with a piping bag to decorate as pencils.
Can I customize my Wafer Pencil Cookies?
Yes! You can customize your Wafer Pencil Cookies by adding different colors of melting chocolate or even sprinkles for added flair.
How long do Wafer Pencil Cookies last?
When stored properly, Wafer Pencil Cookies can last up to 1 week in the refrigerator and up to 3 months if frozen.
What occasions are suitable for these cookies?
These adorable cookies are perfect for back-to-school celebrations, classroom snacks, birthday parties, or any fun event!
Final Thoughts
These Wafer Pencil Cookies are not only easy and delicious but also incredibly versatile. Perfect as a back-to-school treat or any festive occasion, they invite creativity in decoration and flavor. Don’t hesitate to experiment with colors and toppings; your imagination is the limit! Enjoy making these delightful treats!

Wafer Pencil Cookies
- Total Time: 20 minutes
- Yield: Approximately 12 cookies
Description
Make your back-to-school season extra special with these delightful Wafer Pencil Cookies! These charming treats are easy to prepare and perfect for kids and adults alike. Resembling colorful pencils, they add a fun touch to school lunches, classroom celebrations, or birthday parties. With just a few simple ingredients, you can customize them for any occasion while enjoying the sweet combination of vanilla wafers and rich chocolate melts. Get ready to whip up a batch that not only looks great but tastes amazing!
Ingredients
- Vanilla Wafers (Voortman brand recommended)
- Bright White Chocolate Melting Wafers
- Light Pink White Chocolate Melting Wafers
- Mini Chocolate Chips
Instructions
- Cut one end of each wafer cookie into a point.
- Melt the bright white and light pink chocolate wafers in separate bowls according to package instructions.
- Fill piping bags with the melted chocolates.
- Pipe pink chocolate at the bottom of each wafer for the eraser and white chocolate in a triangle shape at the top for the pencil point.
- Before the white chocolate hardens, place a mini chocolate chip at the tip as the pencil lead.
- Prep Time: 15 minutes
- Cook Time: 5 minutes
- Category: Dessert
- Method: Baking
- Cuisine: American
Nutrition
- Serving Size: 1 serving
- Calories: 90
- Sugar: 8g
- Sodium: 30mg
- Fat: 4g
- Saturated Fat: 3g
- Unsaturated Fat: 1g
- Trans Fat: 0g
- Carbohydrates: 13g
- Fiber: 0g
- Protein: 1g
- Cholesterol: 0mg
The Casserole Dish Thousands of Families Can't Cook Without!

Leave a Comment